If your roof has serious problems, get a professional evaluation. It will serve as proof of the extent of the issues and give you leverage to push for a reasonable resolution.
A reputable roofing contractor will take steps to protect your property during installation. For example, they’ll move your vehicles from the work area. This will prevent them from getting damaged by falling debris or tools. Contact Five Star Roofing and Contracting for professional help.
When it comes to roofing installation, preparation is a critical factor for a successful project. Having the right tools and materials on hand will speed up the process, and it’s also important to clear the area around your house to make room for the roofing crew. These preparatory measures will help ensure the safety of everyone involved in the project, and they’ll also set the stage for a finished roof that lasts for years to come.
The first step in the roofing process is to remove any existing shingles, tiles, or metal panels from the roof deck. This allows the crew to start with a clean slate and provides an opportunity for inspection of the roof structure. After the old materials are removed, the roofer can lay ice barrier or underlayment if necessary.
An ice barrier is an underlayment that prevents water from melting snow and ice from seeping through the shingles. It’s particularly important for homes in areas with frequent snowfall, but it can be helpful for any home. The roofing contractor will lay the ice barrier starting at the eave, making sure that it overlaps the drip edge and valley membrane flashing by 4 inches.
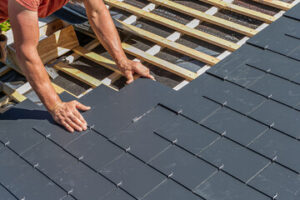
After the ice barrier is installed, the roofing contractor can begin installing shingle strips. The shingles should be laid in a staggered pattern, with the first row placed over the starter strip and then the remaining rows overlapping it by 6 inches. This method of laying shingles ensures that the tabs on adjoining rows line up, and it helps prevent water leaks.
While the roofers work, there will be a lot of noise and vibrations from the hammers and nail guns. This is why it’s a good idea to move breakable items like mirrors, pictures, and decorative wall hangings to other rooms in the house. It’s also a good idea to cover items stored in the attic, as dust and stray nails can fall down during the roofing process. It’s a good idea to let your neighbors know about the work as well, so they can prepare for any noise or debris that may be coming through their yards.
Materials
As with any home improvement project, roofing installation requires a wide range of materials. An expert roofing team can walk you through all the different options that make sense for your goals, architecture and budget.
Shingles: These are the most visible part of your roof and come in a variety of colors, shapes and sizes. They protect the underlying sheathing and add to your home’s aesthetic. They’re traditionally measured in squares, with 100 square feet being considered a “square.”
Underlayment: The underlayment is the first layer of protection against moisture, heat and cold that is installed before you install the shingles. There are several types of underlayment available, including felt, tar paper and synthetic roofing membranes. For flat roofs, the most popular choice is a built-up membrane, which consists of layers of asphalt or coal-tar plies that are heat-welded together to form a single, durable membrane. It’s laid over a layer of felt or other insulation and secured to the deck surface with a special adhesive or mechanically fastened.
Wood shingles and shakes: While beautiful, they’re expensive, require frequent upkeep and are not fire-resistant. They can also be susceptible to mold, termites and other pests. For these reasons, they’re not suitable for homes in humid climates.
Tile: Concrete or clay tiles are durable and available in a variety of color and style choices. Mission and Spanish-style round-topped tiles are a common sight in Florida, while more traditional French and English flat styles are also available. Tile is very heavy, so it’s essential that your roof structure be able to support the added weight. It can also be difficult to remove snow from tile roofs.
Synthetic slate shingles: Made of recycled materials, these faux-slate shingles look like the real thing while requiring far less upkeep and costing significantly less than cedar or slate. They’re a good option for homeowners who want the looks of a natural stone roof without the associated cost or maintenance.
Rubber shingles are an alternative to traditional shingle roofs and provide durability, energy efficiency and weather resistance. They can even help reduce cooling costs.
Installation
This step involves tearing off the old materials (if necessary), inspecting and repairing the roof deck, installing underlayment, flashing, ventilation, and applying the roofing material. Qualified roofers should use manufacturer-approved methods for each material, which will help ensure proper installation and warranty compliance.
It’s important to have adequate attic ventilation to avoid moisture buildup and rot. Your roofer will install intake and exhaust vents, as well as ridge vents, to create airflow across the entire roof surface.
Once the job is complete, your roofer should remove all leftover roofing materials and debris from the work area, and properly dispose of it. They should also rake away any fallen shingles or nails in the yard and around the house, and inspect surrounding lawns and gardens for any missed debris that could pose a safety hazard.
Final Inspection
During the final inspection, the building inspector will verify that all construction has been completed in compliance with the approved plans and standards. This includes ensuring that all inspections have been conducted and that any issues identified during the process have been addressed.
The final inspection is a critical step in the building process and a key component of the overall quality assurance process. A successful inspection can help to reduce rework and costly mistakes, while also improving project outcomes and client satisfaction.
A well-defined final inspection checklist paired with a project completion report form creates a robust framework for quality control. By utilizing technology, such as mobile forms apps, land surveying software, offline surveys and quality control tools, teams can elevate their inspection accuracy while streamlining the project delivery process.
Thoroughly reviewing the project specifications, plans and permits can help ensure that all inspections are properly conducted and the final inspection process is not delayed. It is also crucial that all team members clearly define their roles and responsibilities to ensure no steps are overlooked or missed. By engaging in open communication, all parties involved can minimize any potential problems and work to address them quickly to avoid delays and other costly errors.
Prior to the final inspection, it is recommended that all team members meet with the inspector and review the final inspection checklist together. This will allow all team members to fully understand the expectations of the inspector and what is needed to pass the inspection. Additionally, it will provide an opportunity for team members to ask any questions they have about the final inspection process and what is expected from them.
It is important that all safety issues are addressed prior to the final inspection, including addressing any leaks, cracks or gaps. This will also include ensuring that all plumbing, electrical and mechanical equipment is functioning and properly installed. Lastly, it is vital that all exterior grade around the structure is complete and sloped away from the foundation of the building.
A successful final inspection can be a great way to increase the resale value of a building or property. This is because potential buyers will be more likely to consider a home or building that has a history of passing inspections. In addition, a record of a successful final inspection can reduce future repair costs and improve overall energy efficiency.